Spring Boot com Freemarker usando i18n
Este post mostra como configurar seu projeto para utilizar i18n com Spring Boot e Freemarker
 por Wolmir Cezer Garbin - - Spring Boot - TUTORIAL
 Última atualização em: | 9137 Visualizações
O primeiro passo é criar o projeto e configurar as dependências. Você pode fazer isso usando o start.spring.io ou seguir estes passos.
Criando o projeto com Spring Boot e Freemarker
Em um projeto maven, crie o arquivo pom.xml da seguinte forma:
<?xml version="1.0" encoding="UTF-8"?>
<project xmlns="http://maven.apache.org/POM/4.0.0" xmlns:xsi="http://www.w3.org/2001/XMLSchema-instance"
	xsi:schemaLocation="http://maven.apache.org/POM/4.0.0 http://maven.apache.org/xsd/maven-4.0.0.xsd">
	<modelVersion>4.0.0</modelVersion>

	<groupId>com.example</groupId>
	<artifactId>teste-freemarker</artifactId>
	<version>0.0.1-SNAPSHOT</version>
	<packaging>war</packaging>

	<name>teste-freemarker</name>
	<description>Demo project for Spring Boot</description>

	<parent>
		<groupId>org.springframework.boot</groupId>
		<artifactId>spring-boot-starter-parent</artifactId>
		<version>2.0.0.RELEASE</version>
		<relativePath/> <!-- lookup parent from repository -->
	</parent>

	<properties>
		<project.build.sourceEncoding>UTF-8</project.build.sourceEncoding>
		<project.reporting.outputEncoding>UTF-8</project.reporting.outputEncoding>
		<java.version>1.8</java.version>
	</properties>

	<dependencies>
		<dependency>
			<groupId>org.springframework.boot</groupId>
			<artifactId>spring-boot-starter-freemarker</artifactId>
		</dependency>
		<dependency>
			<groupId>org.springframework.boot</groupId>
			<artifactId>spring-boot-starter-web</artifactId>
		</dependency>

		<dependency>
			<groupId>org.springframework.boot</groupId>
			<artifactId>spring-boot-starter-test</artifactId>
			<scope>test</scope>
		</dependency>
	</dependencies>

	<build>
		<plugins>
			<plugin>
				<groupId>org.springframework.boot</groupId>
				<artifactId>spring-boot-maven-plugin</artifactId>
			</plugin>
		</plugins>
	</build>

</project>
Sua classe principal, fica assim:
import org.springframework.boot.SpringApplication;
import org.springframework.boot.autoconfigure.SpringBootApplication;
import org.springframework.boot.builder.SpringApplicationBuilder;
import org.springframework.boot.web.servlet.support.SpringBootServletInitializer;
import org.springframework.stereotype.Controller;
import org.springframework.web.bind.annotation.GetMapping;

@SpringBootApplication
@Controller
public class TesteFreemarkerApplication extends SpringBootServletInitializer {

	public static void main(String[] args) {
		SpringApplication.run(TesteFreemarkerApplication.class, args);
	}

    @Override
    protected SpringApplicationBuilder configure(SpringApplicationBuilder application) {
        return application.sources(TesteFreemarkerApplication.class);
    }
Este post mostra como configurar seu projeto para utilizar i18n com Spring Boot e Freemarker
	@GetMapping("/")
	public String sample() {
		return "index";
	}

}
Note que foi criado um mapeamento do tipo
getpara testar a página do freemarker dentro da própria classe principal.
O arquivo application.properties fica vazio.
Configurando para usar i18n
Para configurar o seu projeto crie a seguinte classe de configuração:
import org.springframework.context.annotation.Bean;
import org.springframework.context.annotation.Configuration;
import org.springframework.web.servlet.LocaleResolver;
import org.springframework.web.servlet.config.annotation.InterceptorRegistry;
import org.springframework.web.servlet.config.annotation.WebMvcConfigurer;
import org.springframework.web.servlet.i18n.LocaleChangeInterceptor;
import org.springframework.web.servlet.i18n.SessionLocaleResolver;

import java.util.Locale;

@Configuration
public class SpringMvcConfig implements WebMvcConfigurer {

    @Bean
    public LocaleResolver localeResolver() {
        SessionLocaleResolver slr = new SessionLocaleResolver();
        slr.setDefaultLocale(Locale.US);
        return slr;
    }

    @Bean
    public LocaleChangeInterceptor localeChangeInterceptor() {
        LocaleChangeInterceptor lci = new LocaleChangeInterceptor();
        lci.setParamName("lang");
        return lci;
    }

    @Override
    public void addInterceptors(InterceptorRegistry registry) {
        registry.addInterceptor(localeChangeInterceptor());
    }

}
Nesta classe configuramos o interceptor padrão para identificar a linguagem do browser, adicionamos o paramêtro
langpara permitir mudar a linguagem e adicionamos uma linguagem padrão.
Dentro da pasta resources/templates crie o seguinte arquivo index.ftl correspondente a página do freemarker.
<#import "/spring.ftl" as spring/>

<html>

    <body>

        <h1><@spring.message "greeting"/></h1>

        <span><@spring.message "lang.change"/></span>

        <a href="?lang=pt">
            <@spring.message "lang.pt"/>
        </a>
        <a href="?lang=en">
            <@spring.message "lang.eng"/>
        </a>

    </body>
</html>
Por fim, adicione os arquivos de internacionalização dentro da pasta resources:
Arquivo default resources/**messages.properties**
# Default
greeting=Olá! Bem vindo ao Site!
lang.change=Alterar a Linguagem
lang.eng=English
lang.pt=Portugues
Arquivo en resources/**messages_en.properties**
# en
greeting=Hello! Welcome to our website! en
lang.change=Change the language
lang.eng=English
lang.pt=Portugues
Arquivo pt resources/**messages_pt_BR.properties**
# pt
greeting=Olá! Bem vindo ao Site!
lang.change=Alterar a Linguagem
lang.eng=English
lang.pt=Portugues
Por fim, o projeto fica assim:
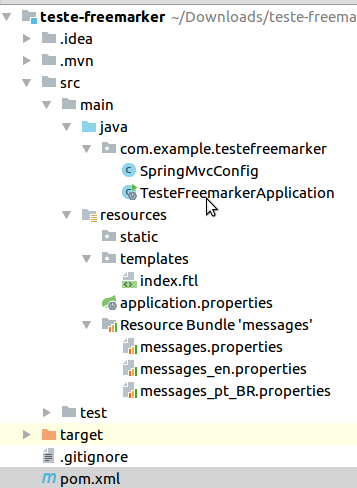
Ao acessar: http://localhost:8080 temos o seguinte resultado:

Você já pode alternar entre portugues e inglês.
Não esqueca de deixar suas dúvidas nos comentários e compartilhar este post.